
Installing a sliding patio screen door is simple. Measure the doorway secure the top and bottom tracks, then insert the screen door. Adjustments may be needed for a snug fit providing an easy and effective way to enjoy fresh air while keeping insects out.
Transform your outdoor space with a sliding patio screen door Wondering, How To Install A Sliding Patio Screen Door? It’s simple measure your doorway, secure the frame, and smoothly slide into a bug free haven. Elevate your home with easy installation and enjoy the fresh air hassle free.
It is easy to install. Start by measuring the dimensions of your door. Assemble the frame components securely. Once assembled, simply slide the screen door into place. Enjoy the outdoors bug free with this simple installation.
Please read through the guides provided before proceeding with your installation.
Materials and Tools
- Sliding patio screen door kit
- Screwdriver
- Level
- Measuring tape
- Hacksaw or miter saw
- Pencil
- Safety glasses
- Drill
- Screws
Step-by-Step Guide:
Step 1. Measure the Opening
Measure the door opening before installing it. Use a measuring tape to find the width and height at different points. Write small measurements first to ensure a good fit. Check by measuring diagonally. Note any protruding features such as thresholds.
Double check your measurements before purchasing a screen door kit. Accurate measurements are essential to a successful installation, ensuring the door fits snugly and moves smoothly.
Step 2. Prepare the Door Frame
After measuring the door opening, the next step is to prepare the door frame. Begin by cleaning the frame thoroughly, removing any debris or dirt. Inspect the frame for any irregularities or damage that might need repair. Ensure that the frame is level and plumb, making any adjustments if necessary.
A clean and well-prepared door frame provides a solid foundation for the installation of the sliding patio screen door, ensuring proper alignment and functionality.
Step 3. Trim the Tracks (if necessary)
If the top and bottom tracks included in your sliding patio screen door kit are too long for your door frame, you may need to trim them. Using a hacksaw or miter saw, carefully cut the tracks to the correct size based on your measurements. Ensure a straight and clean cut to maintain the integrity of the tracks.
Once trimmed, fit the tracks back into the door frame, making sure they align properly. This step ensures that the tracks fit the dimensions of your door frame perfectly, facilitating a smooth installation process for your sliding patio screen door.
.
Step 4. Install the Bottom Track
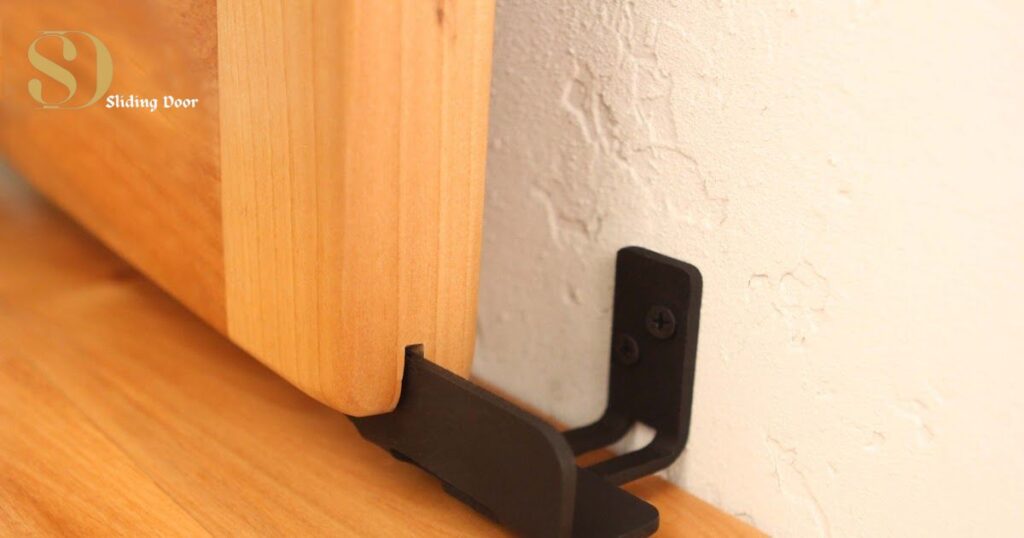
To install the bottom track for your sliding patio screen door, place it on the threshold of the door frame. Make sure the track is level using the level tool.Secure the track to the bottom of the frame with screws.
This track provides a smooth surface for the door to slide along and contributes to the stability of the overall installation. Make sure the bottom track is securely attached and properly aligned before proceeding to the next steps in the installation process.
Step 5. Install the Rollers
To install the rollers for your sliding patio screen door, attach them to the top of the door panel according to the manufacturer’s instructions. Typically, rollers have screws or other fasteners for secure attachment. Ensure that the rollers are evenly spaced and securely fixed to allow smooth movement along the top track.
Once the rollers are installed carefully lift the screen door and insert it into the tracks. Confirm that the rollers are properly aligned with the top track, and the door slides smoothly within the tracks. Adjust the rollers if needed to achieve optimal alignment, ensuring proper functionality of the sliding patio screen door.
Step 6. Enter the screen door
After installing the rollers, carefully lift the sliding patio screen door and insert it into the tracks. Make sure the rollers fit securely into the top track so the door slides smoothly. Align the door properly within the tracks. Make sure it sits evenly and moves without resistance.
Gently rock the door back and forth to confirm that it moves freely within the tracks. This step marks the integration of the screen door into the frame, bringing you closer to completing your sliding patio screen door installation.
Step 7. Installing the H Receiver and Lock

To install the H Receiver and Lock for your sliding patio screen door, position the H Receiver on the edge of the door frame where the door closes. Ensure it is level and align it properly with the door. Secure the H Receiver in place by attaching it to the frame using screws. The H Receiver provides a channel for the door to slide into and typically includes the locking mechanism.
Once the H Receiver is securely installed check the manufacturer’s instructions to install the lock components. This may involve attaching the lock latch and strike plate to the door and frame ensuring they align correctly for secure locking. Test the lock to make sure it functions smoothly. Proper installation of the H Receiver and Lock ensures the sliding patio screen door closes securely and provides an added level of safety and convenience.
Step 8. Installing the Frame Interlock
To install the Frame Interlock for your sliding patio screen door position the interlock piece on the door jamb where the screen door meets the fixed frame. Align it carefully to ensure a proper fit when the door is closed. Secure the Frame Interlock in place by attaching it to the door jamb using screws provided in the kit. The Frame Interlock adds stability to the closed position of the sliding door, preventing it from being easily lifted out of the tracks.
Confirm that the Frame Interlock is securely fastened and functions smoothly by opening and closing the sliding patio screen door. This installation step enhances the overall performance of the door, providing a secure closure and preventing drafts or pests from entering the space when the door is closed.
Step 9. Test the Door
- After installing the sliding patio screen door, it’s time to test its functionality.
- Open and close the door multiple times to ensure it slides smoothly along the tracks.
- Check for any resistance or sticking points during the movement of the door.
- Confirm that the door locks securely using the installed H Receiver and Lock.
- Test the interlock mechanisms, ensuring they engage properly when the door is closed.
- Verify that the door aligns correctly within the frame for a snug fit.
- Assess the ease of using the handle and lock for convenience.
- 8. If needed make any final adjustments to ensure the sliding patio screen door operates seamlessly.
Frequently Asked Question
How do you install a patio screen door track?
To install the patio screen door track, position the bottom track on the threshold to ensure it is level and secure it with screws for a smooth sliding surface.
How do you install a sliding screen door tension roller?
Attach it to the top of the door panel using screws to install it making sure it is evenly spaced to allow for smooth movement on the top track.
How do you install a sliding door lock bar?
To install it align it with the door frame and extend it to the desired length and tighten the screws to secure it in place providing an extra layer of security for your sliding door.
How do you install a sliding door lock bar?
Install a sliding door lock bar by aligning it with the door frame extending it to the desired length and securing it with screws for added security.
Why is testing the door essential after installation?
It ensures the door slides smoothly locks securely and allows for necessary adjustments if needed.
Final Thought
Installing a sliding patio screen door is a manageable task that can enhance the comfort and functionality of your living space. By following a step-by-step process, including measuring the opening accurately, preparing the door frame, and installing essential components like tracks, rollers, and locks, you can achieve a smooth and secure installation.
Remember to test the door’s functionality and make necessary adjustments to ensure it operates seamlessly, providing a convenient and bug-free access point to your outdoor space. With attention to detail and adherence to the manufacturer’s instructions, you can enjoy the benefits of a well installed sliding patio screen door in no time.

For 8 years, I’ve been working with sliding doors. I know all the ins and outs, from how they’re designed to how they work. I’m here to share my expertise.